Let's build a Blender Pixabay Addon – Part 3
- Caching API responses
- Downloading preview images
- Displaying preview images in the UI
- Closing Thoughts
In the last part, we created custom properties for search parameters, started working on the UI, created a flow to ask-save-load the API key and made some requests to the API.
Today, our goal is to find a way to display the search results in the UI. We will be looking at:
- Creating a simple caching mechanism from scratch to cache responses
- Downloading preview images from the responses we get from the API
- Displaying the downloaded preview images in the UI
Let’s get started!
Caching API responses
The Pixabay API documentation states that all requests must be cached for 24 hours to keep the API fast for everyone. So let’s be nice and do that. :)
The requests package that we are using to make requests does not have builtin support for caching. There are other packages like CacheControl and requests-cache that work with the requests package to enable caching. But, just like we did with the build process in part 1, we are going to build a simple solution from scratch.
The basic idea behind caching is save the response of each request locally when it’s made for the first time. For every request we make, we first check if the corresponding response is already in the cache. If it does, we simply use that, otherwise we make a request to the API and save the response to the cache.
To cache our requests we are going to be storing them as JSON files to the addon directory that we created in the previous part. In order to achieve this we will be using a combination of json, hashlib and datetime modules.
First let’s modify the register() method in the __init__.py file to create a directory named cache in the addon directory. We will be using this directory to store the cached API responses:
    ...
    except Exception as e:
        print(str(e))
        print("API key not set.")

    cache_dir = os.path.join(wm.pixabay_addon_dir, "cache")

    if not os.path.exists(cache_dir):
        os.mkdir(cache_dir)

    operators.register()
    ...
Exactly where we add these lines in our register() method doesn’t matter at the moment. I have chosen to add it immediately after the try-except block where we check for the API key. Now, keep the addon directory open in a file explorer and press the ▶️ button in the Blender Text Editor. You should see the cache directory appear in the file explorer.
Great. Now let’s open the props.py file and make the following changes to it:
import os
import bpy
import requests
from .common import (
    response_get_from_cache,
    response_save_to_cache
)


def search_results_get(self, context):
    wm = context.window_manager

    params = {
        "q": self.q,
        "image_type": self.image_type,
        "orientation": self.orientation,
        "order": self.order,
        "page": self.page
    }

    resp = response_get_from_cache(params)

    if resp is None:
        r = requests.get(
            wm.pixabay_base_url,
            params={**params, "key": os.environ.get('PIXABAY_API_KEY')}
        )

        resp = r.json()
        response_save_to_cache(params, resp)


class PixabaySearchProps(bpy.types.PropertyGroup):
    ...
Note that we have modified the search_results_get functions such that:
-
we first try to get the response from the cache use
response_get_from_cachefunction. -
if it returns
None, only then we make a request to the Pixabay API -
once we get a response, we save it to the cache using
response_save_to_cacheand continue to printing out the preview image URLs
Also note that we have removed the API key from our params dict and passing it only when making the request. This ensures that the params passed to the cache functions do not contain the key. I have also removed the for loop that prints out the preview URLs.
The functions response_get_from_cache and response_save_to_cache don’t exist yet, so let’s create them. Open the common.py file and add the following code to it:
import os
import json
import hashlib
import platform
from pathlib import Path
from datetime import datetime, timedelta


...

def hash_md5(input_str):
    return hashlib.md5(input_str.encode()).hexdigest()


def cache_file_get_from_params(params):
    addon_dir = addon_directory_get()
    params_hash = hash_md5(json.dumps(params, sort_keys=True))
    cache_file = os.path.join(addon_dir, "cache", f"{params_hash}.json")

    return cache_file


def response_get_from_cache(params):
    cached_resp = cache_file_get_from_params(params)

    if not os.path.exists(cached_resp):
        return None

    now = datetime.now()
    cached_at = datetime.fromtimestamp(os.path.getmtime(cached_resp))

    if (now - cached_at) < timedelta(hours=24):
        print("Reading response from cache.")

        with open(cached_resp, "r") as f:
            return json.load(f)

    return None


def response_save_to_cache(params, resp):
    cached_resp = cache_file_get_from_params(params)

    print("Saving response to cache.")

    with open(cached_resp, "w") as f:
        json.dump(resp, f)
We have added four new functions to common.py. Let’s understand what they do:
-
hash_md5– this function computes the MD5 hash of a given string. We use this function to come up with a file name for each response we save to the cache. The reason we are doing this is that hashing lets us to pass any arbitrary data of any size and arrive at a constant length string that is unique to that data. This makes it convenient for us to save the responses to individual file in our cache directory without having to worry about a naming scheme. -
cache_file_get_from_params– this function takes the search parameters –params– as a dict and returns the path to the corresponding cache file. Note that we are using thejson.dumpsmethod to convert the dict into a string in order to be able to hash it. Also note that we are setting thesort_keysparameter toTrueto sort the dictionary entries before dumping them into a string. This ensures that our hash remains the same for a given set of parameters even if we pass them in a different order. -
response_get_from_cache– this function does exactly what is sounds like – gets a response from the cache. It checks if the response for a given set ofparamsalready exists in the cache. If it exists, it uses thedatetimemodule to check if the response was cached less than 24 hours ago. If yes, it returns the cached response, otherwise it simply returnsNone. -
response_save_to_cache– this function is pretty self-explanatory – it uses theparamsdict to construct the cache file path and saves the response as a JSON file to the cache directory.
With all of this in place, we now have a simple caching system. Let’s test it!
Press that ▶️ button in the Blender Text Editor, keep the cache directory open in a file explorer and start searching. You’ll see that, as you make a request for the first time, they get stored in the cache directory using the file name computed by the hash function.
Now try searching for something that you previously searched for. You will notice that no new file was created. This is because the response was read from the cache. If you look into the Blender Console, you can see Saving response to cache and Reading response from cache messages being printed out as responses are saved to and read from the cache respectively.
Great! Now let’s move on to downloading preview images from the responses.
Downloading preview images
Let’s start by setting up a directory to save preview images to similar to our cache directory. Open the __init__.py file and make the following changes to it:
    ...
    except Exception as e:
        print(str(e))
        print("API key not set.")

    for dir_name in ["cache", "previews"]:
        directory = os.path.join(wm.pixabay_addon_dir, dir_name)

        if not os.path.exists(directory):
            os.mkdir(directory)

    operators.register()
    ...
Note that we simply changed the cache directory creation by wrapping it in a for loop and passing the directory names – cache, previews – from a list. Eventually, if we want to setup more directories, we can simply add them to this list. If you want, you can press the ▶️ button in the Text Editor and verify if this creates a previews directory.
With that in place, let’s open props.py and make the following changes:
import os
import bpy
import requests
from .common import (
    response_get_from_cache,
    response_save_to_cache,
    preview_images_get,
)


def search_results_get(self, context):
    ...

    if resp is None:
        r = requests.get(
            wm.pixabay_base_url,
            params={**params, "key": os.environ.get('PIXABAY_API_KEY')}
        )

        resp = r.json()
        response_save_to_cache(params, resp)

    wm["pixabay_preview_images"] = preview_images_get(resp)
We are importing a function named preview_images_get (which doesn’t exist yet) and passing the resp object to it. And we are storing the result in custom property named pixabay_preview_images in the window manager.
Note that, unlike other properties we created so far, we did not create this property in the register() function of the main __init__.py file. We could create a PropertyGroup to represent images in our addon and then create a CollectionProperty using that property group to store a list of images. But the above method works good for now and keep things simple.
Okay, now let’s dive into the actual problem of downloading the preview images. Let’s open common.py again, add the following code and then discuss what each function does:
import os
import json
import hashlib
import platform
import requests
from pathlib import Path
from datetime import datetime, timedelta
from concurrent.futures import ThreadPoolExecutor, as_completed


...


def image_path_from_url(url, image_type):
    images_dir = os.path.join(addon_directory_get(), image_type)
    extension = url.split(".")[-1]
    image_name = f"{hash_md5(url)}.{extension}"
    image_path = os.path.join(images_dir, image_name)

    return image_path


def download_image(url, filepath):
    try:
        print(f"Downloading: {url}")
        resp = requests.get(url, timeout=10)

        with open(filepath, "wb") as f:
            f.write(resp.content)

        return url, filepath

    except requests.RequestsException as e:
        return url, None


def download_images(image_list):
    downloaded = [ ]

    with ThreadPoolExecutor(max_workers=10) as executor:
        futures = [executor.submit(download_image, url, filepath) for url, filepath in image_list]

        for future in as_completed(futures):
            url, filepath = future.result()

            if filepath is not None:
                downloaded.append(os.path.basename(filepath))
            else:
                print(f"Unable to download: {url}")

return downloaded-
image_path_from_url– the image path from url takes two parameters –url,image_type– and constructs the image path. We will use theimage_typeparameter to specify the type of the image we want to construct the path for. In this part, we will only be passing"previews"as the image type which corresponds to the directory we just setup. But in the subsequent parts, we will reuse this function when downloading high-resolution images by passing a different image type. -
download_image– this function is pretty straightforward – it takes an image URL and a filepath, and downloads that image to the given filepath. We have set thetimeoutparameter to10in therequests.getmethod, so that it doesn’t hang forever in case something goes wrong. Note that if the download was successful, it returns the URL and the filepath. One the other hand, if an exception is raised, it makes the filepathNone. We will be using this behavior in the next function. -
download_images– this function takes a list of(url, filepath)tuples and downloads all the images concurrently using multiple threads. This is the most interesting function in this bunch. Let’s understand how it works:-
We use the
ThreadPoolExecutorfrom theconcurrent.futuresmodule to create a fixed pool of threads – ten in this case – and reuse them to perform multiple tasks concurrently. -
Using it with the
withstatement makes the program wait until all the images finish downloading. -
The first argument to the
executor.submit()method is the function that we want to execute using threads. Anything that comes after it corresponds to the arguments of that function. -
The
as_completedfunction can be used to iterate through the future objects as they complete their execution. So, basically, as each image gets downloaded, we get the return value from each execution using thefuture.result()method. -
If the download was successful for a given future object, we append the filename of the donwloaded image to the
downloadedlist. Otherwise we simply print out an error message, and finally return thedownloadedlist.
-
Now, let’s tie everything together by writing the preview_images_get function. Add the following code to the end of the common.py file:
...

def preview_images_get(resp):
    to_download = [ ]
    preview_images = [ ]

    for hit in resp["hits"]:
        preview_url = hit["previewURL"]
        preview_image_path = image_path_from_url(preview_url, "previews")
        preview_image = os.path.basename(preview_image_path)

        if os.path.exists(preview_image_path):
            preview_images.append(preview_image)
        else:
            to_download.append((preview_url, preview_image_path))

    preview_images.extend(download_images(to_download))

    return preview_images
There are a couple of things worth noting. For every hit in the response, we construct the preview image filepath and check if it already exists on the disk. If it does, we simply append its filename to the preview_images list. Otherwise, we append the URL and filepath to to_download list that we then process using the download_images function and finally extend the preview_images list with its output.
Now, keep the previews directory open in a file browser, press the ▶️ button in the Blender Text Editor and search for something in our UI. You will notice the previews directory getting populated with preview images.
Great! We have done most of the ground work to display search results in the UI. The only thing left is to find a way to actually display these images in the UI.
Displaying preview images in the UI
To display preview images in the UI we will be using two handy features of the Blender API: Preview Collections and Dynamic Enums. Preview collections are a way to generate in memory previews of images so that they can be displayed in the Blender UI. And Dynamic Enums enable us to dynamically define the items of an EnumProperty using a callback function instead of using a static list of values like we did for the search properties.
First, let’s make some changes to the register() and unregister() functions in the __init__.py file:
...

preview_collections = { }


def register():
    import bpy.utils.previews
    from bpy.types import WindowManager

    ...

    WindowManager.pixabay_base_url = "https://pixabay.com/api/"
    WindowManager.pixabay_addon_dir = addon_directory_get()

    WindowManager.pixabay_preview = bpy.props.EnumProperty(
        items=enum_previews_from_response,
    )

    pcoll = bpy.utils.previews.new()
    preview_collections["pixabay_previews"] = pcoll

    wm = bpy.context.window_manager
    key_file = os.path.join(wm.pixabay_addon_dir, "api_key")

    ...


def unregister():
    ...

    bpy.utils.unregister_class(PIXABAY_PT_view3d_panel)
    operators.unregister()
    props.unregister()

    ...
    del WindowManager.pixabay_search_props
    del WindowManager.pixabay_preview

    for pcoll in preview_collections.values():
        bpy.utils.previews.remove(pcoll)
    preview_collections.clear()

...
In the register() function we are creating a new EnumProperty named pixabay_preview which we will be using to display previews in the UI. Note that we are passing a function named enum_previews_from_response to the items parameter. This function will be responsible for generating previews using the data returned by preview_images_get function we saw in the previous section. We are also setting up a new preview collection named "pixabay_previews" which will be used for generating the previews.
In the unregister() function, we do the usual house-keeping. We delete the newly added enum property and also clear the previews from the preview collection. Note that we have declared the preview_collections dict at the top before the register() method. I have also moved props.unregister() from the end and calling it immediately after operators.unregister(). Mainly did this to prevent errors when rebuilding the addon. If you were facing any issues so far with rebuilds, I recommend restarting Blender after making this change.
Now let’s write the enum_previews_from_response function. This function borrows heavily from the builtin Ui Previews Dynamic Enum template in the Text Editor, except, for us the directory from which we will be generating previews isn’t going to change.
...

def enum_previews_from_response(self, context):
    enum_items = [ ]

    if context is None:
        return enum_items

    wm = context.window_manager

    if not "pixabay_preview_images" in wm: #1
        return enum_items

    directory = os.path.join(wm.pixabay_addon_dir, "previews")

    pcoll = preview_collections["pixabay_previews"]

    for i, name in enumerate(wm["pixabay_preview_images"]):
        filepath = os.path.join(directory, name)
        icon = pcoll.get(name)

        if not icon: #2
            thumb = pcoll.load(name, filepath, 'IMAGE')

        else:
            thumb = pcoll[name]

        enum_items.append((name, name, "", thumb.icon_id, i)) #3

    return enum_items

...-
We check if the
"pixabay_preview_images"attribute exists in the window manager. If it doesn’t exist, we simply return an empty list. This could happen when Blender was just launched and no searches were made. We could technically mitigate this by including the creating of this attribute in theregister()function, but let’s not worry about it yet. -
Here we check if a given image already has a preview in the collection. If it doesn’t exist, we load it using the
.load()method on our preview collection. Otherwise, we get the existing value icon from the collection. -
Here we append the items to the
enum_itemslist. Each item is a tuple of five values corresponding to identifier, name, description, icon and number. Note that we are passing theicon_idas the fourth entry in the tuple. You can read more about EnumProperties here.
Now, let’s finally add an image browser widget to our panel to display the preview images:
import bpy
import os
from . import operators
from . import props
from .common import addon_directory_get
class PIXABAY_PT_view3d_panel(bpy.types.Panel):
...
def draw(self, context):
...
col = layout.column()
col.template_icon_view(wm, "pixabay_preview")
col.separator()
col.prop(search_props, "q")
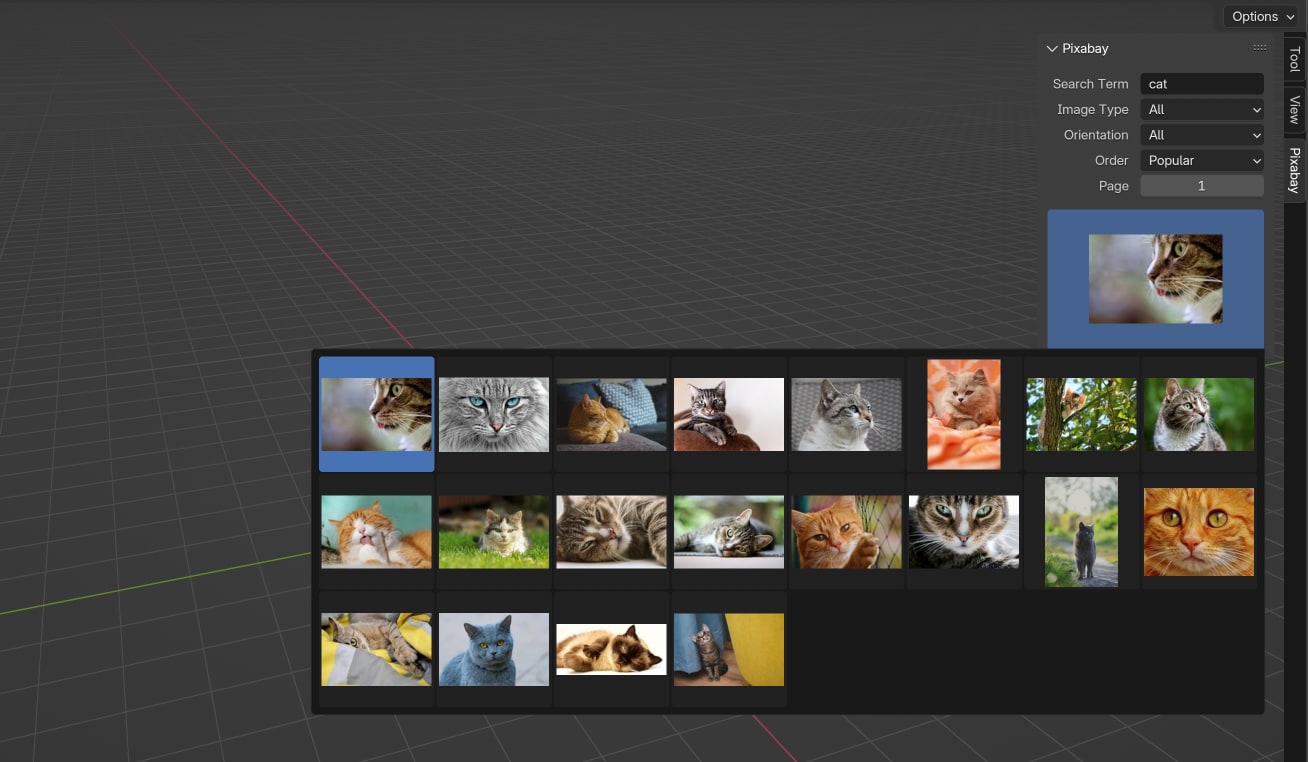
...That’s it! We now have everything in place to be able to search for images and display then in the UI. Go ahead and press that ▶️ button in the Text Editor one last time and try searching for something. You will notice that as you search, the image browser populates previews from the search results:
By the way, I added the image browser at the end of the panel for the sake of the screenshot. For you it should appear at the top of the panel.
Closing Thoughts
I know we covered quite a lot of ground today. Please take your time to internalize and understand the ideas we discussed, because the next part is going to be a bit more involved. We will be looking at display a large preview as an overlay in the viewport using the GPU module.
Stay tuned! 🙌🏻
P.S. You can get the source code for this part on Gumroad. If you have previously got the source code from the previous parts, this should already be in your library.
Subscribe to my newsletter
Join 1500+ Technical Artists, Developers and CG enthusiasts who receive my latest posts on Blender, Python, Scripting and Computer Graphics directly to their inbox.